Contents:
In October, 2013, the main instrument for the WIYN 0.9-m telescope was switched from the imaging camera called S2KB to a new camera called the Half Degree Imager (or HDI for short). The two cameras are similar in many ways, but differ in two main respects:
HDI is built around the e2V 231-84 CCD chip ; specifically, a 231-84-1-142 deep depletion chip, serial number 20110426, with astronomy process and a broadband anti-reflective coating (thanks to Alice Reinheimer of e2V for this information). You can look at a quick comparison of the properties of S2KB and HDI to get an idea for the differences between them.
The properties of HDI are roughly shown below. Look in the Technical Notes for more information.
      mode          readout time       gain (e-/ADU)    readnoise (e-)
    ----------------------------------------------------------------------
      4-amp            9 sec               1.3             7-8

      1-amp            35 sec              1.3             7.3
    ----------------------------------------------------------------------
You can find descriptions of technical tests of HDI in a series of Technical Notes. If you have material to contribute to this archive, please contact Michael Richmond.
The most direct way to operate HDI is to use a web browser to connect to a simple command-line interface. Go to
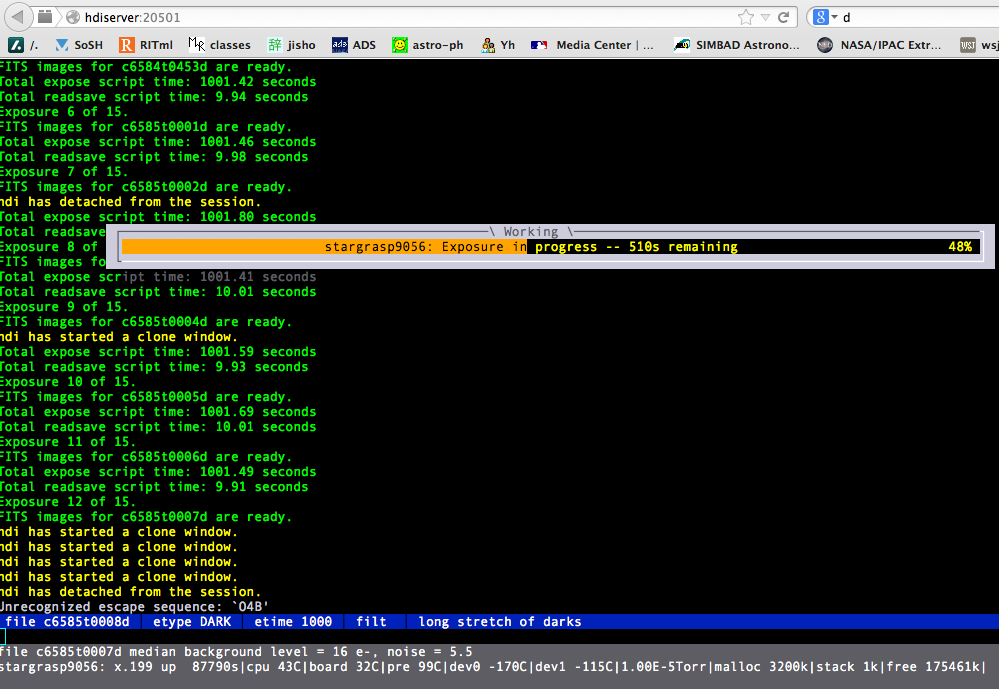
Your browser should display a bunch of text in a variety of colors, something like this:
Most of the screen contains a mixture of green and yellow text: these are messages printed by the camera controller as it goes through the steps of reading out the chip, saving the data to disk, and so forth. Down at the bottom of the screen, the text in the grey background provides status information on the condition of HDI: next to dev1 is the temperature of the CCD, for example. The single line of text with a blue background shows the current image information: in this case, the most recent file had type DARK and an exposure time of 1000 seconds.
Near the bottom of the screen, between the grey CCD status information and the blue image information, is a single blank line. In this space, the user can type commands. One can use the up-arrow and down-arrow keys to recall past commands quickly, and the left-arrow and right-arrow keys to move the cursor within a line of text.
One of the most important commands is help. In response, the system will list all the commands:
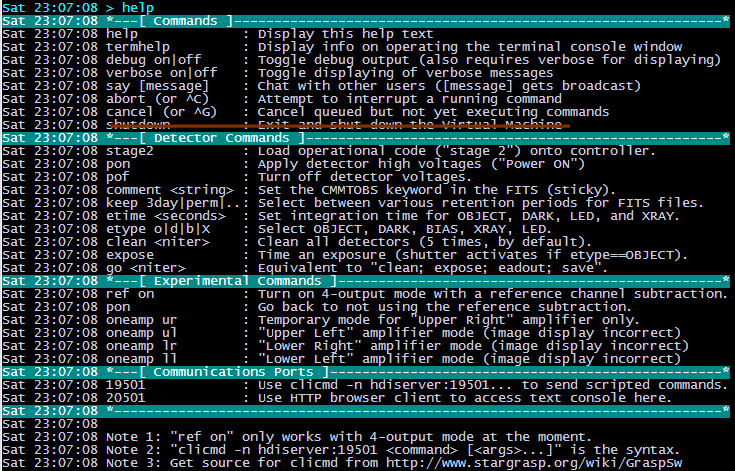
Observers will typically need only a few of these commands.
Starting up and shutting down
Switching amplifier modes
Setting image properties
The choices are
Taking an exposure (or series of exposures)
Please do not issue the "shutdown" command. If you do, you will leave the camera in a frozen state from which the only solution is manual intervention by people who are off-site. Don't do it.
When the user types go to take an exposure, the camera will go through a series of steps: cleaning the CCD, opening the shutter, waiting for the desired time, closing the shutter, reading out the CCD, saving the image on the HDI data archive.
During these procedures, a window will pop up in the web command display.

This window will show the progress of each task as it executes. During this time, the user will be unable to type new commands.
In order to abort an exposure or sequence of exposures, the user can type "Control-C" (hold Control key, type "c" at the same time). When the user issues this command, the current image will continue to count down to the end of its exposure time, but will not read out; any future images in a sequence will not be taken. After an abort, the camera may print error messages; if so, follow the steps described in Troubleshooting to recover.
Images are assigned names with a format like
    c6584t0023o00.fits

       in which

         'c'           is always the first letter
         '6584'        are final 4 digits of Julian Date at UT = 00:00
         't'           follows the Julian Date
         '0023'        is a four-digit index of images taken this day
         'o'           encodes "type" of image:  'b' = bias
                                                 'd' = dark
                                                 'o' = object (also for flats)
         '00'          always follows the "type"
         '.fits'       is the file extension
Each image is placed into a separate directory in the data archive. The name of the directory is the same as the first 11 characters of the image's file name. Thus, the image in the example above,
    file  c6584t0023o00.fits    is in directory   c6584t0023o
          -----------
One can access an image in the data archive by its URL; in our example above, we would go to
After all exposure tasks have completed, the user can look at the image and download it. To do so, he should switch to the web image browser and quick display and click on the date string to refresh the list of images. In the example below, the date string is 20131020, in bold white font.
All the images taken by HDI are automatically saved in a computer dedicated to the camera, which serves as a data archive. The user can access images in this archive through a web browser.
The browser should show a display like this:
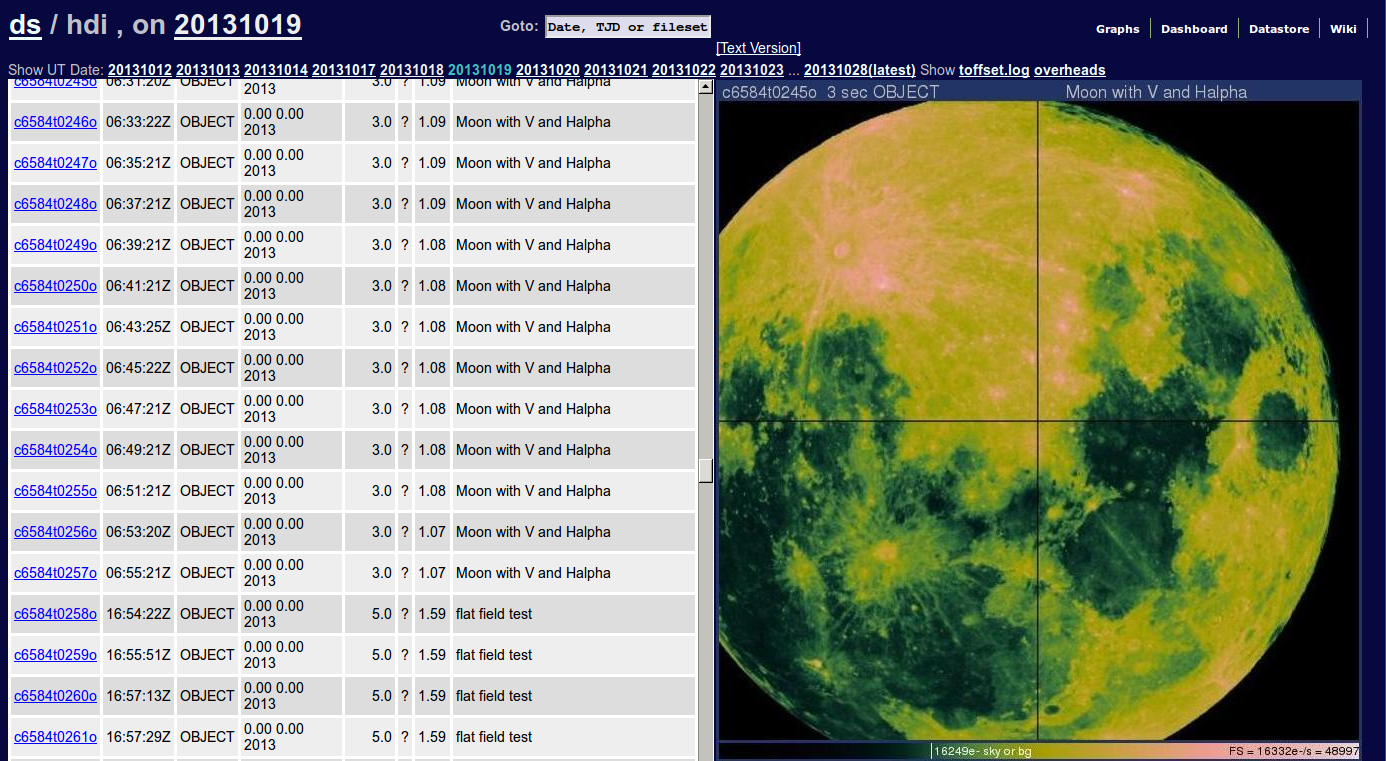
The basic structure of this display is threefold:
Clicking on the current date string (20131019 in the example above) will refresh the list. It's a good idea to do this regularly in order to see the latest images.
The very first column, filesetID, is the name of a directory holding information on each image. Clicking on this column will take the user to another web page -- see the discussion below.
At the bottom of the JPEG image, a single line of text provides some information on statistics of the image. The median value is listed with text like this:
16249 e- sky or bg
Even though this text states "e-", the
units of this value are ADU, not electrons.
If one clicks on the filesetID column of the data archive browser, one will be taken to a web page like the following:
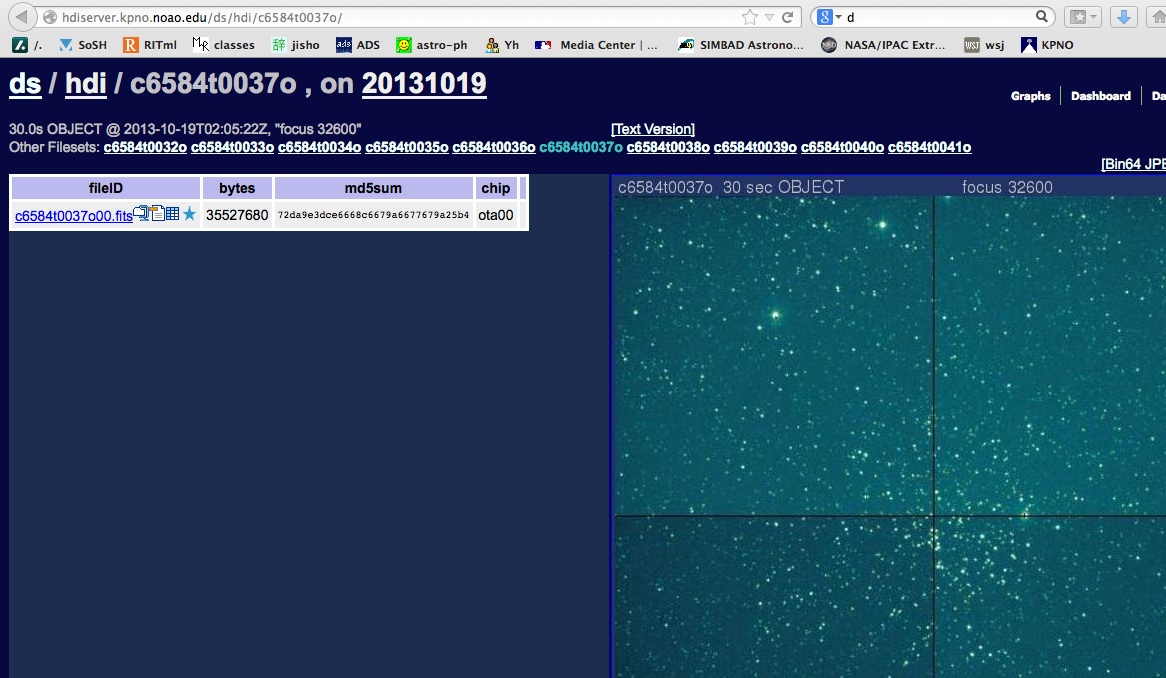
One sees again the same three-part display:
This time, the image link contains the full file name of a FITS image: in the example above, c6584t0037o00.fits . If the user clicks on this link, a window will pop up asking if the user would like to
or
Note that all raw HDI files are not simple FITS images, but are instead multi-extension FITS files (MEFs). Working with MEFs is a bit more complicated than with simple FITS images. It might help to read the NOAO guide to working with mosaic CCD data.
A few of the properties of HDI are logged continuously and displayed on a set of graphs. The user can see these graphs by clicking on the word Graphs in the upper-right corner of any of the HDI web pages.
Below is an example of these graphs; click on the image for a full-sized version.
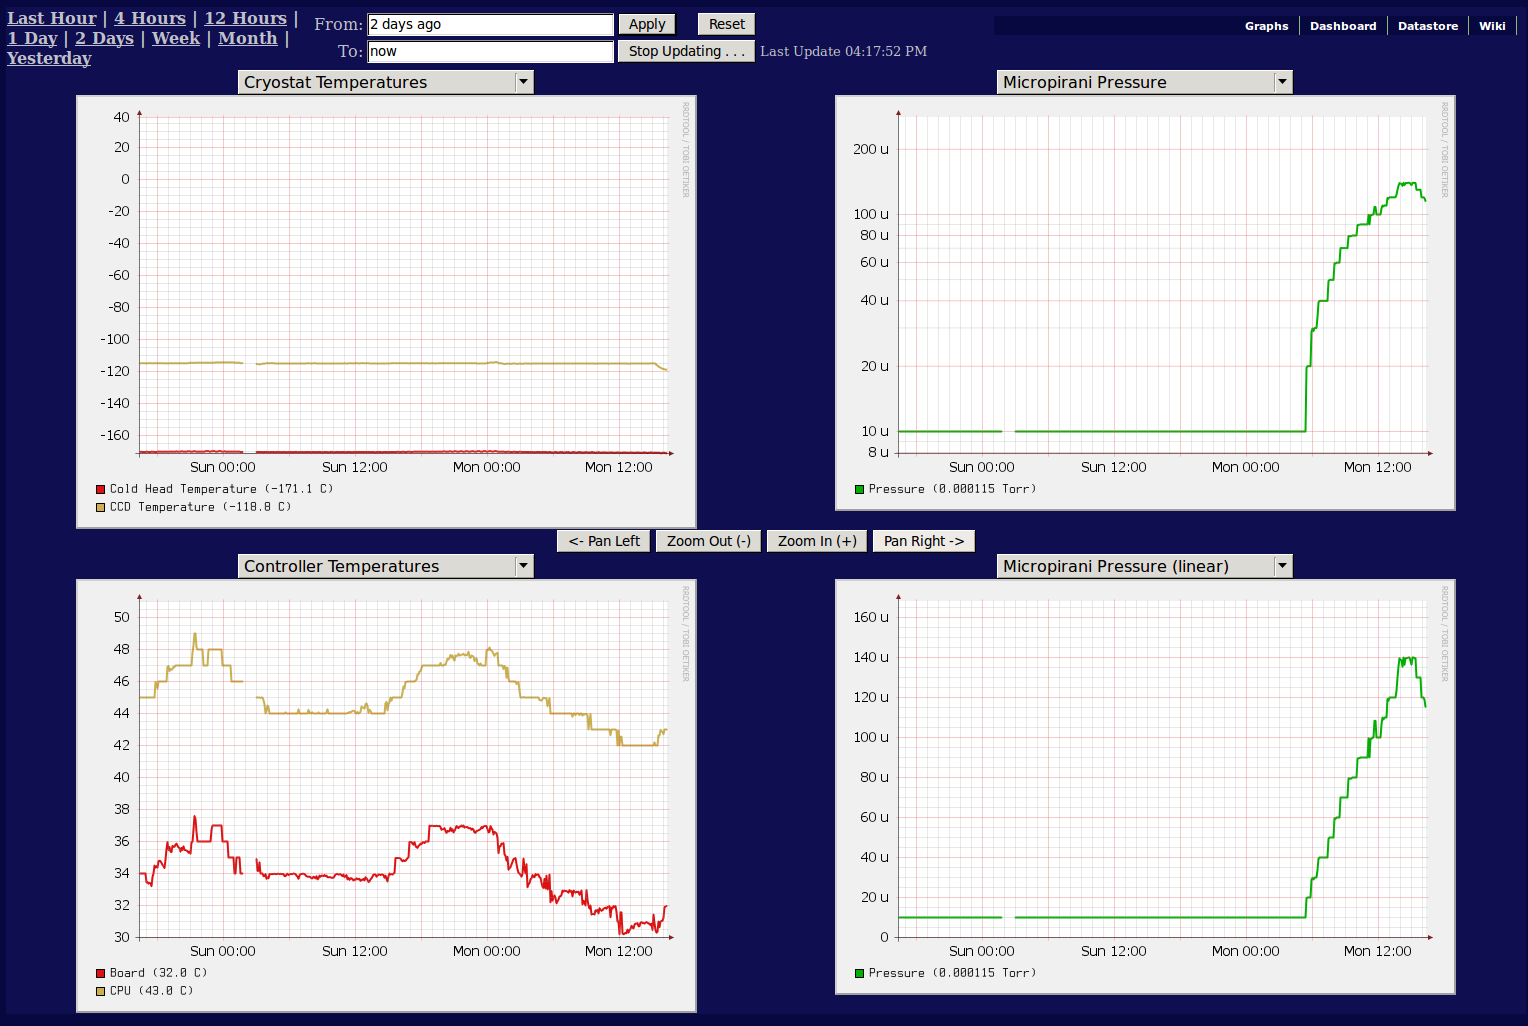
The four graphs show
The pressure values on the y-axis are in torr. Any values below 500 micro-torr are probably not very precise -- don't worry if you see spikes or dips, as long as their values remain below 500 micro-torr.
By default, all HDI images are stored on a dedicated computer which is connected directly to HDI. It is that computer which serves the images and other information via the web interface described above.
Most observers will need to copy the data from this datastore to the computer emerald in order to examine it in detail, and in order to transfer it to their home institution or a laptop. There are two ways to do this.
bash
which will start an instance of the Bourne-again shell
and set the $PATH to include a number of special directories.
hdi_follow.pl savedir=DIR
where DIR is the full path name of the directory
on emerald
into which you want your images to be copied;
full path name means that the directory's name
must begin with a "/" (slash) character.
We recommend very strongly that you specify
a directory under /data/data1/.
For example, you might create a directory /data/data1/oct23_2013 and then type
hdi_follow.pl savedir=/data/data1/oct23_2013
After you run the command, the script will watch for NEW images to be taken by HDI; it will ignore all pre-existing images. As new images appear, they will be copied to emerald and to the NOAO backup archive. You should see a running list of new images which have been copied, something like this:
       %  hdi_follow.pl savedir=/data/data1/mwr_oct29_2013/
       to stop this script, type 'Control-C' or kill the window
       in which the script is running.
       copied c6594t0038d00.fits ... (Cntl-C to quit)
       copied c6594t0039d00.fits ... (Cntl-C to quit)
Let this process continue to run while you take images. Just leave the window alone and open other windows to do all your work.
bash
which will start an instance of the Bourne-again shell
and set the $PATH to include a number of special directories.
           hdi_grab.pl   YYYY-MM-DD  HH:MM:SS

       or

           hdi_grab_set.pl   YYYY-MM-DD  HH:MM:SS   YYYY-MM-DD HH:MM:SS
where the first YYYY-MM-DD specifies the
UT date of the earliest image you want to copy,
and the first HH:MM:SS
is the UT time of the earliest image you want to copy.
For example, you might type
hdi_grab.pl 2013-10-30 02:20:00
in order to copy all images taken more recently than
UT 2013 Oct 30 02:20:00.
The second form of the command, with two sets of dates and times, will copy all the images which were created between the given dates. Thus,
hdi_grab_set.pl 2013-10-30 02:20:00 2013-11-01 12:00:00
in order to copy all images taken between
a starting time of UT 2013 Oct 30 02:20:00
and
an ending time of UT 2013 Nov 01 12:00:00.
This command will copy ALL images within the given time frame to the current dirctory.
HDI saves raw images in FITS files, but they aren't the simplest type of FITS files. Every raw HDI image consists of a header unit, and then at least one extension:
Some image processing packages will properly handle complex FITS files, but others will not; moreover, properly displaying all the data in a multi-amp image can be a little tricky, as the orientation of the data may change from amplifier to amplifier.
If you would like to create simplified FITS images for quick-look purposes during your run, you may use the scripts described below. The first one, fitsconv.csh, is "safe" -- it will not modify data values at all -- but limited: it only works on images read through a single amplifier. The subsequent ones will divide all pixel values by 2, but can be used on either 1-amp or 4-amp images.
This routine supplied by Douglas Arion of Carthage College in Nov, 2016. Thanks!
This script is designed to work on a set of raw HDI images at all once. To use it,
cp ~/Carthage/fitsconv.csh .
./fitsconv.csh
The script will create a new subdirectory called Converted
and place converted, simple FITS images into this subdirectory.
The converted images will have the same names as the original
raw images. The raw images will not be modified.
The data values in the simplified images created by the following scripts will be modified from their raw values. Don't use them for science unless you really know what you are doing.
The first step is to start the Bourne Shell, and then type a single command:
bash
followed by
heainit
which will set up a number of environment variables so that the scripts below will run properly. This may change your current directory, so it may be necessary to cd back to your previous directory before you continue. Also, the changes made to your environment library variables by heainit may cause other programs to fail to run properly. You should probably use this shell only for image-conversion work, and use other terminal shells for your other work.
hdi_1amp_to_simple.pl c6584t0023o00.fits
The original image will remain unmodified, and a new file will be created with a similar name: the final three characters of the original name (o00 in the example above) will be converted to the string "_1", to indicate that the multi-HDU original FITS file has been turned into a simple 1-HDU equivalent. In the example above, the output file will be
c6584t0023o00.fits ---> c6584t0023_1.fits
You may provide a name with a wildcard character as an argument in order to convert many images with a single command, like so:
hdi_1amp_to_simple.pl c6584*00.fits
To run the program, type
hdi_4amp_to_simple.pl c6584t0023o00.fits
The original image will remain unmodified, and a new file will be created with a similar name: the final three characters of the original name (o00 in the example above) will be converted to the string "_mos", to indicate that the multi-HDU original FITS file has been turned into a simple 1-HDU "mosaic" equivalent. In the example above, the output file will be
c6584t0023o00.fits ---> c6584t0023_mos.fits
You may provide a name with a wildcard character as an argument in order to convert many images with a single command, like so:
hdi_4amp_to_simple.pl c6584*00.fits
HDI is still not a mature instrument. Some of the software is in a state of flux. Experienced observers who have used S2KB may note the following (as of Jan 22, 2014):
FILTER
However, keywords FILTER1 and FILTER2 are set to the
numerical values of the filterwheel positions.
For example, if filterwheel 1 is in position 3,
FILTER1 = '103',
and if filterwheel 2 is in position 4, FILTER2 = '204'.
New version vmhdi-1.0 fixes some earlier keyword issues. The following keywords are now set properly in the FITS header: OBJECT, OBSERVER, MJD-OBS, DATE-OBS.
Ron Probst provides the following suggestion:
      - Decide what to do: e.g. 32200-32400 by steps of 50, so 5 exposures
      - Set focus to starting point. Set jog to desired step size.
      - Set "etime" to 10 sec and write appropriate "comment"
      - Do "go 5" to take a series of 5, with only one cleaning cycle at start.
      - As first exposure is reading out, jog focus to next value for second exposure.
      - Repeat through series of 5 (in this case) exposures.
      - Transfer images to emerald and examine with imexam.
We have created a tool which will help you to pick the best focus value from a set of images WHICH YOU HAVE ALREADY TAKEN; for example, following Ron Probst's steps 1-6 above. Please read
Earlier problems with quick-look JPEG in HDI's browser have been fixed: the orientation is now North up, East left.
ds9 -multiframe image.fits
Alternatively, if one has already started DS9, one can use the DS9 window's GUI to load and display a 4-amp image as follows: File -> Open as -> Mosiac IRAF, then select the desired image.
Images read via a single amplifier suffer from a different annoyance: by default, only the central portion of the image is displayed. One can display the entire image by appending [xy00] to the end of an image name, thus: image.fits[xy00].
Shutting down the camera should NOT be an ordinary action. The only situations which require it are
In case you are facing one of these situations, here's the procedure:
pof
power stargrasp off
If possible, before turning the power off to the computer hdiserver, contact Peter Onaka's team (who built HDI) and ask them to stop the software (virtual machines) on hdiserver. You can send E-mail to Sidik Isani at isani at ifa dot hawaii dot edu. If there's no time, because a storm is coming, then just follow the shutdown procedures and hope for the best. It's possible that when re-starting after an emergency shutdown, the computer hdiserver may not initialize properly, which may cause HDI not to work. The solution is to contact Peter Onaka's team and wait for them to fix the problem.
These are known failure modes of HDI, and the procedures to recover from each.
       Network connection failed for command `etype object': error: receive-select timed out

       Failed to connect to controller: error: connect failed (errno 113)
pof
Wait for 30 seconds, and check to see if the camera now
responds to commands. If so, you are finished with
the procedure, and can go back to regular operations.
If the camera is still not responding, then it is necessary to do the following -- which will recover camera control, but also cause images to have an excess of signal spread over the active area for over an hour. Type
power stargrasp cycle
followed by
stage2
Several lines of warning messages may appear at this point.
That's okay.
After they finish, type
pon
It is a good idea to take 2-4 bias images at this point, as the first images acquired after recovering communications may be somewhat corrupt.
         etype b
         go 3
Moreover, images taken for the next hour or two will show
an excess of charge in the active area, above the levels
in the overscan columns. This excess will decrease
exponentially with a timescale of order one hour,
so for broadband images with high background levels,
it may not cause any big problem. If your images
have very low background levels, you may find it difficult
to analyze these images properly.
After HDI was returned to KPNO in late 2014, measurements indicate that the response to light may be non-linear above roughly 30,000 counts per pixel. See HDI Tech Note 8 for the details.
We recommend flatfield exposures with mean values less than 30,000 counts.
You can read a chronological list of flatfield exposure times at
The table below shows only the most recent reported values.
The most recent measurements were made by RIT students Ashley Frank, Natasha Nigam, and Shane Guernsey in Jan, 2020. Some older measurements are present as well.
| Filter | Lamp setting | Exptime (sec) | Mean counts |
| U | High 100% | 45 | 21,000 |
| B | High 54% | 10 | 20,000 |
| V | Low 100% | 9 | 19,000 |
| R | Low 100% | 5 | 19,000 |
| I | Low 100% | 5 | 19,000 |
| 6580 | High 70% | 8 | 23,000 |
| 6620 | High 50% | 12 | 23,000 |
| 6660 | High 70% | 7 | 23,000 |
| 6700 | High 50% | 12 | 25,000 |
| Stromgren b | High 70% | 19 | 23,000 |
| Stromgren H-Beta wide | High 70% | 19 | 21,000 |
| Gunn Z | Low 100% | 15 | 25,000 |
| V plus 6620 | High 100% | 100 | 15,000 |
Thanks to Douglas and Follette for the Gunn Z value, added 6/20/2016