
- About WIYN
- Observing at WIYN
Available Instruments
Optical Imaging
Infrared Imaging
Spectroscopy
Observing Tools
Observing Planning
At the Telescope
After Your Run
- Internal Use
WIYN Oversight
Calendars
A Short User's Summary of Bench CCD Monsoon and Bench Control Procedures
9-15-08 (revised 9-28-15, dww)
Abbreviations
- BM - Bench Menu GUI
- BSS - Bench Spectrograph Setup GUI
- MOP - Monsoon Observing Platform
- GUI - Graphical User Interface
- PAN - Pixel Acquisition Node
- MCC - Monsoon Camera Control
Startup on the Mac-mini "wiyn-2"
- Login: observer
- Password: standard WIYN password which should be listed on one or more of the monitors.
- If a small GUI labeled "Bench Menu" (BM) is not visible, double click the Bench & Hydra icon.

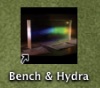
The Bench Menu GUI The Bench & Hydra icon on the Desktop
- The Bench Spectrograph status and control GUIs (2) must be up and running before starting the CCD control software.
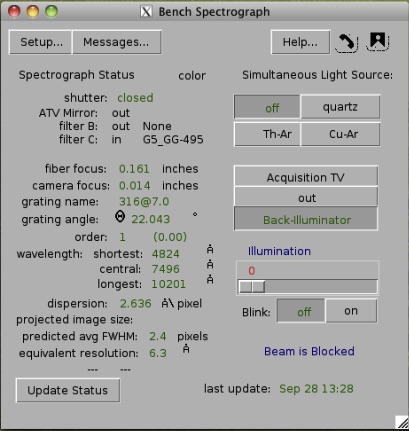
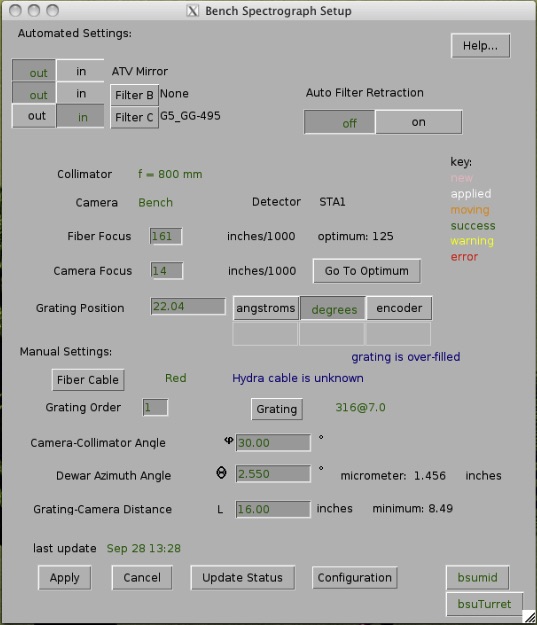
The Bench Spectrograph GUI The Bench Spectrograph Setup GUI
Click the "Bench Setup" button on the BM GUI. In a few seconds the "Bench Spectrograph" and "Bench Spectrograph Setup" (BSS) GUI windows should appear. The "Bench Spectrograph" GUI shows the status of all the spectrograph motors and also controls the fiber Acquisition TV and the fiber Back-Illuminator. The numerical values displayed should be green. If not, check that the "bsumid" and "bsuTurret" buttons in the lower right corner of the BSS GUI are green. If either is red, one or both will need to be started, see "Troubleshooting" below. - Click "Clear PAN" in the BM GUI. The message "Pan wait" will appear near the top of the BM GUI. It should then indicate "Ready" after 10 seconds or so.
- Click "Start PAN" in the BM GUI. A small window will pop up with the message "Starting PAN, please wait". Five windows will appear:
- Shell - Start benchPan
- Pan Capture
- Pan Daemon
- Pan Process Algorithims
- Pan Saver
- Start the MOP by clicking on the "Start MOP" button on the BM GUI. Three windows will appear and also momentarily an "initializing camera" banner:
- Monsoon Camera Control (MCC) - bench
- MOP debug log
- DS9
- An IRAF session window will also be needed for interacting with the data. This is created with the "IRAF" button on the BM GUI.
- Set the data directory by clicking the directory box in the MCC GUI.
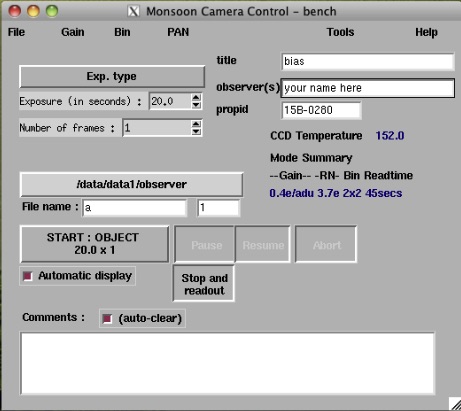
The MCC GUI A "Choose Directory" box will pop up.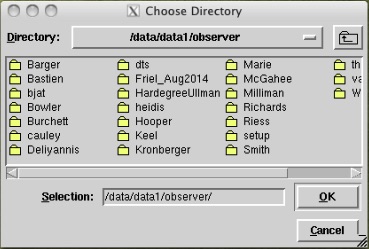
An existing directory can be selected, or a new one created by typing in the "Selection" window. It should be a sub-directory of /data/data1/observer/. Click "OK" twice after your selection. - Select the gain with the "Gain" button on the MCC GUI.
- Select the desired binning with the "Bin" menu button on the MCC GUI. See the tables on gain and binning choices for more information.
- Set the Exposure type, Number of Frames, and Exposure time on the MCC GUI.
- Enter the image file name and number. Subsequent images will be incremented automatically.
- Enter a title and check that the "observer(s)" and "propid" fields have the correct information if your instrument start-up person did not already do so.
- Click the "START:" button on the MCC GUI.
- Comments can be typed into the "Comments" field before or during the integration.
- The read out data will be displayed in the DS9 image display window. Standard IRAF tasks can be used to plot and examine data.
- An autolog program can be started that will create a browser-based web page that can be edited for comments as needed. This is created with the "Autolog" button on the BM GUI. It is important to type in the data path exactly as shown in the MCC GUI directory window in order for the log sheets to be created. It is also good to unclick "Print log sheets automatically" if only the postscript version is desired.
- On the MCC GUI "Tools" menu, select "Exit and shutdown PAN" - this closes the MOP interface and shuts down the PAN.
- If error messages appear in the MOP debug log window, pull down the PAN menu on the MCC GUI and select "Reset PAN". If the reset is successful as indicated in the MOP debug log, continue operations.
- If the reset fails, exit the MOP with the MCC "Tools" menu button ("Exit and shutdown PAN"). Click the "Clear PAN" button in the BM GUI and then restart the MOP.
- If a couple cycles of Step 2 do not fix it then one should ask for help.
- If either or both of the "bsumid" or "bsuTurret" windows has red text, log into cork from a terminal window: "ssh cork". Type "ps auxw | grep bsu" to check the status of the two clients. If they are not running, type "start-bsmid" and/or "start-bsut". The grating turret will need to be "homed" by typing "home" in the "Grating Position" window in the BSS GUI. Be sure the rotation path of the grating turret is clear before clicking the "Apply" button on the BSS GUI since the turret will rotate through a large angle range.
The first window will disappear after the rest are loaded. These can all be minimized if no errors appear.
The "MOP debug log" window can be minimized if no errors appear.
Observing
Software Shutdown
Troubleshooting
MOP Problems
Bench Spectrograph control


wiyn-contact@noirlab.edu WIYN Observatory 950 N. Cherry Ave, Tucson, AZ 85719 

Last modified: 03-Apr-2020 16:09:46 MST
- Observing at WIYN